

Texture Manager is a tool that allows you to analyze a scene and reveal which textures are currently in scene, where are they pointed to, copy, move or retarget them to a different location and much more. Currently, it supports file and mentalrayTexture nodes, but it easily extendable (see below).
All actions and options available in Texture Manager is accessible via main menu. Most used ones are also available through main toolbar buttons.
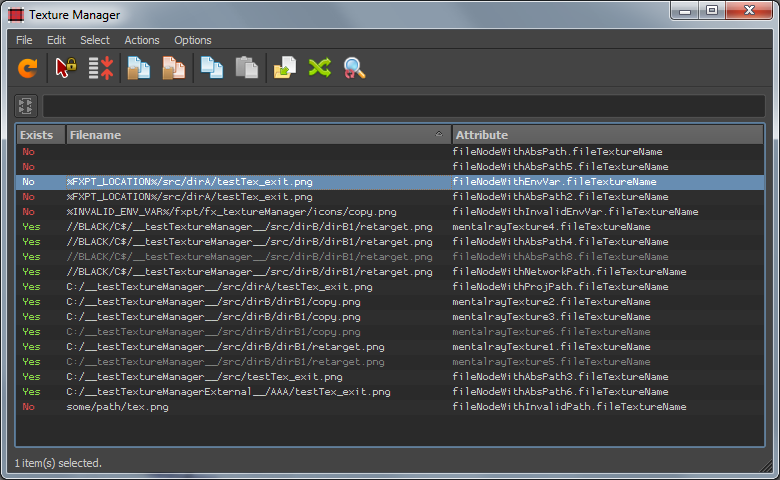
Scene analysis result presented in table with 3 columns:
- Exists – does a filename, pointed by texture node, really exists on disk or network path. Note that Texture Manager knows about Environment Variables and can handle them properly.
- Filename – filename attribute of texture node.
- Attribute – texture node and attribute containing texture filename
Some of the records are presented by usual color and some by “dimmed”. When record is dimmed, this means that this texture node is not attached to any geometry in scene. To be precise: this texture node is not a part of shading network attached to any shadingGroup, or shadingGroup with this texture node in network is empty. Be careful, cause it does not mean that this texture node is useless – sometimes texture nodes can be connected to some attributes of cameras, renderGlobals or something else.
Above main table there is a filter field. Just type something and you can view records only containing this filter string.
Main menu reference
File
Refresh – will reanalyze a scene.
Exit – close Texture Manager
Edit
Copy – select ONE record in results table and click this menu item. Filename will be copied to Texture Manager clipboard.
Paste – select at least one record in results table. If you click Paste, all filenames will be replaced with Texture Manager clipboard value.
Copy Full Path – all full paths (full directory name + filename + extension) of selected filenames will be copied to operating system clipboard
Copy Filename – all filenames (filename + extension) will be copied to operating system clipboard
Select
Select All – select all in results table
Select None – select none in results table
Select Invert – invert selection in results table
Options
Collapse Repetitions – if enabled, only one record in results table will represent all texture nodes with this particular filename in scene.
Analyze Selection – select something in scene and after activating this option Texture Manager will populate results table with texture nodes attached to this selected geometry. It will operate only on these texture nodes until you deactivate this option.
When selecting records in results table:
Select Nothing – do nothing
Select Assigned – select geometry with corresponding texture node(s) assigned
Select Texture Node – select corresponding texture node(s)
Actions
Delete Unused Shading Nodes
Same as Hypershade -> Edit -> Delete Unused Nodes.
Copy/Move
This action allows you to copy or move, and optionally retarget texture nodes to new location.

Copy to – destination directory
Retarget – retarget texture nodes to new location
Delete sources – delete original files. In other words, perform Move instead of Copy
Copy folder structure – enable this option, if you want to copy files retaining original folder structure, instead of storing them all in destination folder. To help Texture Manager understand how to construct this folder structure, you will need to provide an “Original root folder”. For example, suppose you have texture nodes with these filenames:
C:/MyProject/textures/sky.tga
C:/MyProject/textures/buildings/wall.tga
C:/MyProject/textures/buildings/roof.tga
C:/MyProject/textures/grass/grass1.tga
and you want to move them to a new location D:/MyNewProject/textures.
Without “Copy folder structure” option, all textures will be copied to destination root folder:
D:/MyNewProject/textures/sky.tga
D:/MyNewProject/textures/wall.tga
D:/MyNewProject/textures/roof.tga
D:/MyNewProject/textures/grass1.tga
If you enable “Copy folder structure” and setup “Original root folder” as C:/MyProject/textures, files will be copied to following destinations:
D:/MyNewProject/textures/sky.tga
D:/MyNewProject/textures/buildings/wall.tga
D:/MyNewProject/textures/buildings/roof.tga
D:/MyNewProject/textures/grass/grass1.tga
Copy additional textures – in some production pipelines, there are some additional “partner” textures which can be possibly lying in the same folder as “main” texture, representing normal maps, specular maps and so on. But these textures can have no representation in Maya scene (have no texture nodes, just existing on disk). If you want to copy them as well, activate this option and supply name suffixes separated by commas to identify them.
For example, suppose you have texture nodes with these filenames:
C:/MyProject/textures/buildings/wall.tga
C:/MyProject/textures/buildings/roof.tga
If you enable “Copy additional textures” and provide “Texture suffixes” like this – _nm, _spec – all following textures (if exists) will be copied with the “main” one:
C:/MyProject/textures/buildings/wall_nm.tga
C:/MyProject/textures/buildings/wall_spec.tga
C:/MyProject/textures/buildings/roof_nm.tga
C:/MyProject/textures/buildings/roof_spec.tga
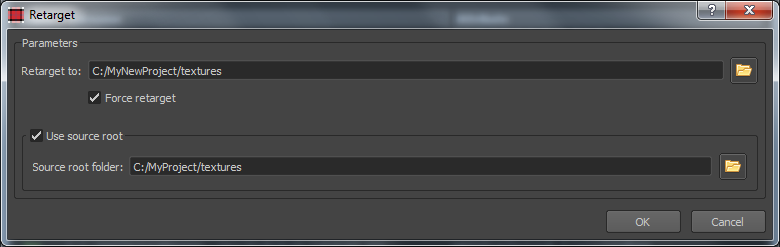
Retarget
This action will retarget existed filenames in texture nodes to a new location.
“Simple” retargeting algorithm:
- Scan target folder and all subfolders, and store filenames (filename + ext in lowercase) in database with its full filename (full directory name + filename + extension). Any duplicates will be discarded. For example, suppose you have textures in target directory:
C:/MyProject/textures/buildings/wall.tga
C:/MyProject/textures/towers/wall.tga
The second one will be excluded from database. - Process texture nodes, find its short filename in lowercase (filename + ext) and if you find it in database change texture node to corresponding full path stored in database.
In simple words, it will seek for textures in the target folder and all its subfolders, and if it will find the first match it will retarget to this location.
Retarget to – a directory to retarget texture nodes.
Use source root – try find a texture relative to original location. Better to explain it by example. Suppose you have texture node with this filename:
C:/MyProject/textures/buildings/wall.tga
and you retargeting to
D:/MyNewProject/textures
and your “Use source root” option is
C:/MyProject/textures
First of all, retarget processor will try to find a texture
D:/MyNewProject/textures/buildings/wall.tga
If it does not exists, it will proceed with “Simple” retargeting.
Search and Replace
This action will search a string in filenames and replace it with a provided one.
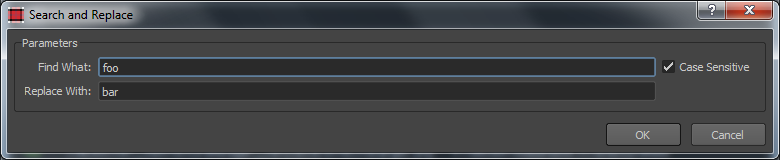
Find what – a string to search
Case sensitive – search is case sensitive
Replace with – a string to replace with
Extending with other texture node types
It is very simple. Just visit fxpt\fx_textureManager\Harvesters.py and add a record to TEX_ATTRIBUTES dictionary:
key: texture node type
value: list(attributes containing texture filenames)
Using in batch mode
Texture manager was designed to allow it’s use in batch mode and it is completely decoupled from UI. You can use it’s processors (fxpt\fx_textureManager\Processors.py) and harvesters (fxpt\fx_textureManager\Harvesters.py) to construct your own processing pipelines without UI interaction. Moreover, ProcessorCopyMove can work even outside Maya environment.
Installation
Texture Manager is a part of FX Python Tools. Download fxpt from Github and place it in your PYTHONPATH directory. Run following code in Script Editor or make a shelf button.
from fxpt.fx_texture_manager import fx_texture_manager
fx_texture_manager.run()